Review by Katie Tarrant
Edited by Jake Basten
Founded in 2001, iZotope are one of the biggest and most respected names in the audio industry. Specialising in all facets of audio recording and production, iZotope make some of the most comprehensive and transparent software I have ever used, and have products that cater to every stage of the audio process. Not only satisfied with making great products, they are also dedicated to helping the community, and regularly release tips and guides on how to use their software, and also improve your production skills as a whole.
For this review, I’ll be checking out their acclaimed O8N2 Bundle, which consists of Ozone 8 Advanced (a mastering suite) and Neutron 2 Advanced (a mixing suite). Let’s start with Ozone 8.
OZONE 8 ADVANCED
FIRST LOOK
If you’re familiar with either the mixing or mastering process, the moment you open Ozone 8, you’ll be greeted by many familiar features. It comes with an Equalizer, Compressor and Maximizer automatically loaded, surrounded by a miscellany of options that we’ll get to later. Even if you’re not familiar with audio production, Ozone 8 doesn’t look too overwhelming on start-up, with a clear and well-organised layout that you can soon find your way around.

Your top bar shows your preset drop down, as well as what preset you’re currently using. This is accompanied by an undo button, a ‘History’ button to look back at the recent changes you’ve made with the software, a Settings button to access some under-the-hood features like your Buffer Size, Tooltips, Loudness Target etc., and a Help button that will take you straight to the plugin’s documentation. You can also reach the Settings for each plugin by just right-clicking anywhere on the window of the plugin that’s loaded and selecting the ‘Options’ in appearing drop-down.
AUDIO MONITORING
Your waveform is always visible as a singular white line across the frequency spectrum that outlines whatever plugin you’re using. Your Input and Output levels are permanently on view on the right-hand side of your window, giving you a continual overview of the status of your track. Above these meters are your Peak and RMS levels which will update all the while your audio is playing. You can adjust your input and output levels with the faders, and unlink the faders on both sides so you can independently adjust the gain for your left and right channels. On the left of your window, you can also quickly switch between Stereo, Mid/Side, and your Left and Right channels (See Fig. 1), soloing them if necessary.
Underneath your I/O faders, we have the facility to ‘Bypass’ whatever plugin we have selected. There is also an all-important Gain Match option which will tell Ozone to maintain your gain level when your plugin(s) are bypassed which is essential for being able to objectively hear what your plugins are contributing to your mix without the bias of levels changing. We can alternate between Stereo and Mono and flip the Stereo Image and the ease of this is great as you can constantly keep an ear on how your mix is sounding when it’s dropped into a mono format.
Additionally, we can add a ‘Reference Track’ to compare with the track we’re working on. When you add your reference track, it will appear in its own section with the sections roughly calculated by iZotope based on where the transients lie. This is ideal for selecting or looping certain parts of the track that you might want to focus on. A/B comparisons with a reference track is something some of us do and some of us don’t, but it can be an extremely valuable and educational process to try as it will allow you to highlight any strengths or weaknesses your track has compared to a professional release or particular genre.

Finally, there is the ‘Codec’ tab, and a ‘Solo Artifacts’ option that enables us to actually listen to what auditory information we’ll be losing by selecting certain codecs. We also have the Dither tab for when we may need to prepare audio for specific formats, with its own settings that we can adjust, such as the Bit Depth, Dither Amount, Noise Shaping and more. These options, plus additional dithering elements like the DC offset and Bit Meter reinforce iZotope’s philosophy of full transparency of your audio and enable you to clearly monitor the conversion process.
PRESETS
For ease of use, both Ozone 8 come with a hefty collection of presets so you can quickly get to your end result without too much in-depth tweaking. There is a huge range of presets to choose from, divided in to ‘All Purpose Mastering’, ‘Genre-Specific Mastering’, ‘Instruments and Busses’, and ‘Signature Presets’. You can flick forwards and backwards through the presets and the clear structure of Ozone 8 enables you to have an instant view of what each one is doing to your sound as you flick through. Some of the presets include ‘Added Warmth’, ‘Brighten Overall Mix’, ‘Thick Transients’, ‘Vintage Rock’, ‘Detailed Drums’, ‘Enhanced Midrange’, and much more, and are all well-designed starting points.
DESKTOP APP
Ozone 8, and Neutron 2, can be used both as a standalone desktop app or as a plugin in your DAW. The only difference with the desktop app is that your track overview will be visible in between your preset and your plugins. Your transport bar will also appear next to your preset dropdown, and alongside a clear visual counter of what track you are working on, what point in the track you’re currently playing at, and the total duration.

Like the ‘Reference Track’ viewer, it has a nifty time code feature that detects where the approximate sections of the song are based on the song’s transients. Clicking each section will highlight that area of the track for you, and will play from and loop that point. You can extend, reduce or remove this by clicking and dragging the highlighted edges. You can also easily add crossfades, or select start and end points for the track which enables you to pick and choose exactly what components you want to focus on.
PLUGINS
Your plugins are all accessible as tabs, with an EQ, compressor/limiter, and maximizer pre-loaded when you open the software. To re-organise your effects chain, you can drag and drop the order of the plugins you have loaded. To load additional plugins, there is a handy ‘+’ tab at the end of your chain, which will bring up a menu of all of Ozone’s in-built plugins, such as their Exciter, Imager, Vintage Compressor and Vintage Limiter, Spectral Shaper, and much more. The EQ plugins are incredibly intuitive to use for any skill level, and with everything being so visible, it’s hard to lose track of what you’re changing and what effect it’s having. Even if you do, you can always use that nifty ‘History’ option I mentioned earlier to look back at all of the changes you’ve made so far.
Moreover, there is a ‘Plug-Ins’ tab in this menu that allows you to access and load your own third party VST’s. You can have up to 6 plugins at a time which feels like a solid amount for me, although may disappoint those who likes to use a higher number than this. However, it is possible to load each plugin as a standalone plugin on your FX chain, so there is nothing stopping you from having Ozone 8 loaded with 6 plugins, and then loading a few of its other available plugins as standalones to go with it, or just using it alongside any other third party plugins you own.
EQ
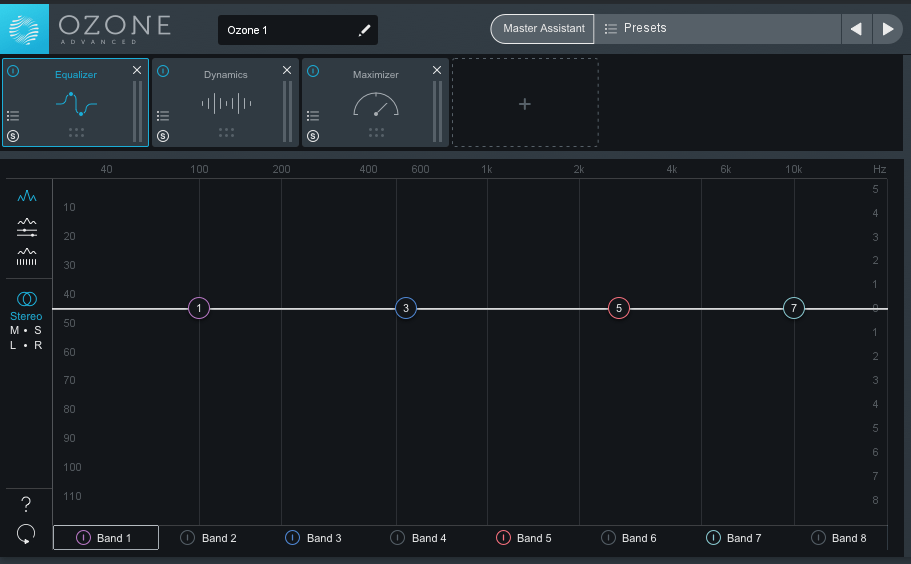
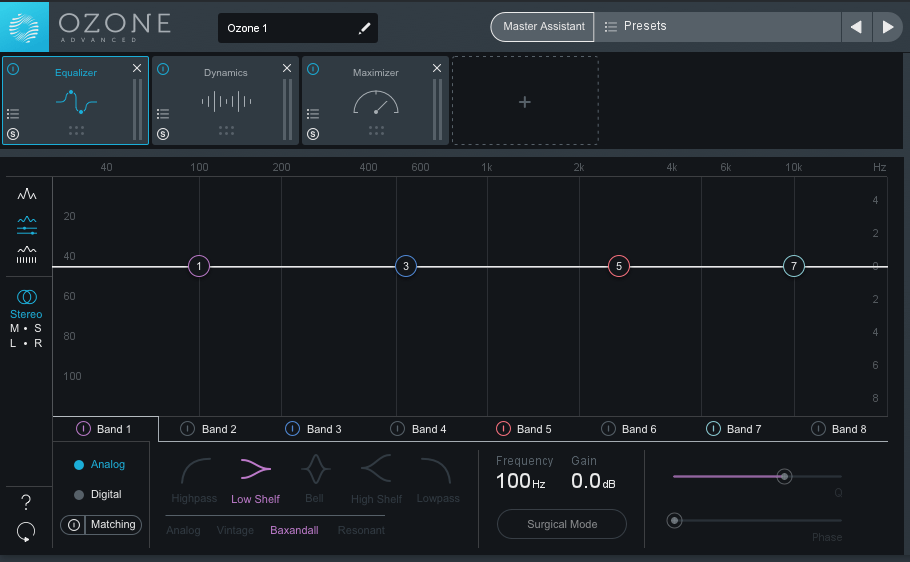
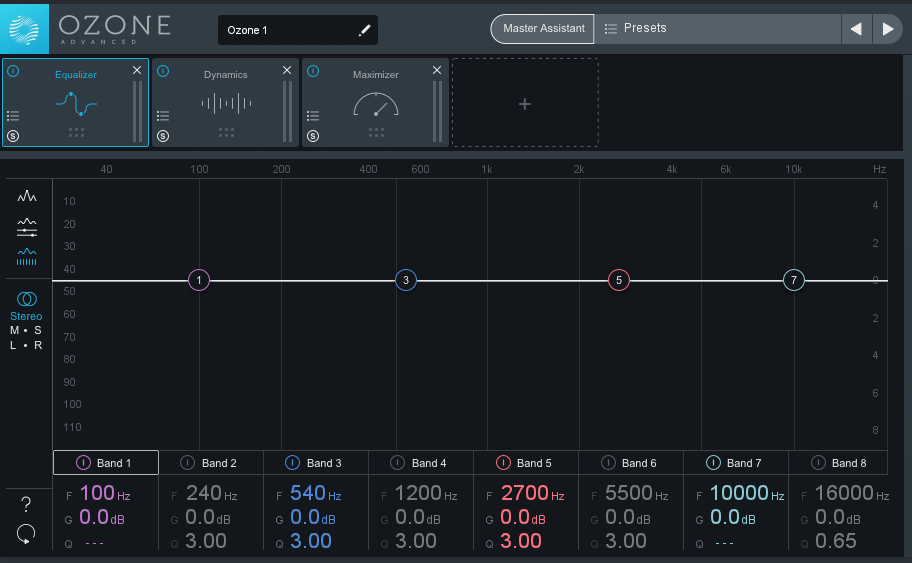
On the main window, your 8-band EQ is already loaded, with bands 1, 3, 5, and 7 ready to go and the remaining 4 bands able to be added with a simple click of a button. You can swap between three main views in this EQ. The first is Spectrum View (see Fig. 4) which will just show your highlighted bands and frequency spectrum. The second is Detailed Band View (see Fig. 5) which brings up your curve selection options, Analog to Digital switch, and Frequency, Gain, and Q adjustments.
Finally, there is also the All Band View (see Fig. 6) which shows all of your bands with numerical values for Frequency, Gain and Q levels, and you can click and drag these to change them, or double-click and type in your preferred value, which just made EQ adjustments so simple for me. Your high pass, low shelf, bell, high shelf, and low pass curves can be set with a single click and have a slope option that allow you to quickly nudge the curve tighter or wider. The ‘Surgical Mode’ that can be used when the EQ is set to ‘Digital’ is also brilliant for making acute and fine-tuned adjustments to each band. You can also solo each band to have a precise listen to how much of your track resides within those frequencies and what they’re contributing to your mix.
Moreover, the Dynamic EQ goes a step beyond what is achievable with a normal EQ and allows you to apply individual compression levels to each band, as well as set up a ‘Dynamic Trigger’ mode that will monitor your mix and adjust the EQ bands throughout. You can even use ‘Auto Scale’ to to make Ozone automatically alter the attack and release of each of your bands based on the frequencies it hears.
DYNAMICS
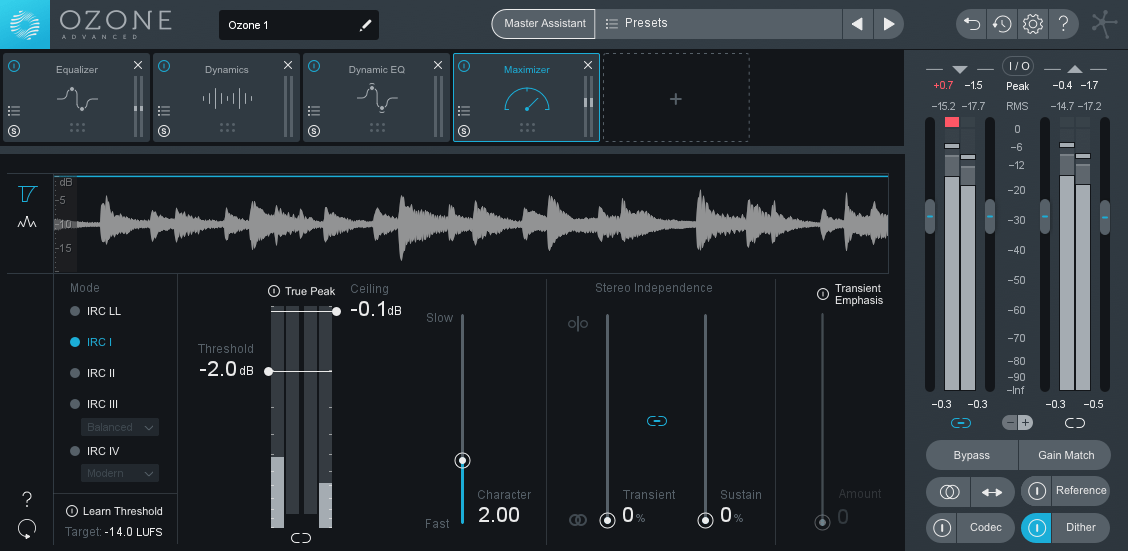
Ozone 8 features a combined compressor and limiter with simple faders for your ratio, attack, release, and knee. Parallel compression can be applied with a wonderful little slider that can be dragged between dry and wet for part or full application. You can also apply the compression and limiting across the bands the same way that you do with your EQ which is ideal when targeting specific areas in your track. The ‘Learn Threshold’ quickly becomes invaluable as you can simply enter what LUFS level you want to get to, and iZotope will adjust the mix to reach it.
ADDITIONAL PLUGINS
As well as what is mentioned above, Ozone has a range of other plugins available. As mentioned in the introduction, these include an Imager, Spectral Shaper, Post EQ, Exciter and several vintage plugins (Vintage EQ, Vintage Tape, Vintage Compressor and a Vintage Limiter). iZotope do a fantastic job at combining the analog and digital worlds, and have excelled at finding the best way for you to achieve the analog sound you desire, with the convenience of the digital process. The vintage plugins add a rich character and a warmth that is reminiscent of older analog gear but are still as much of a dream to handle as their digital counterparts.
REFERENCE
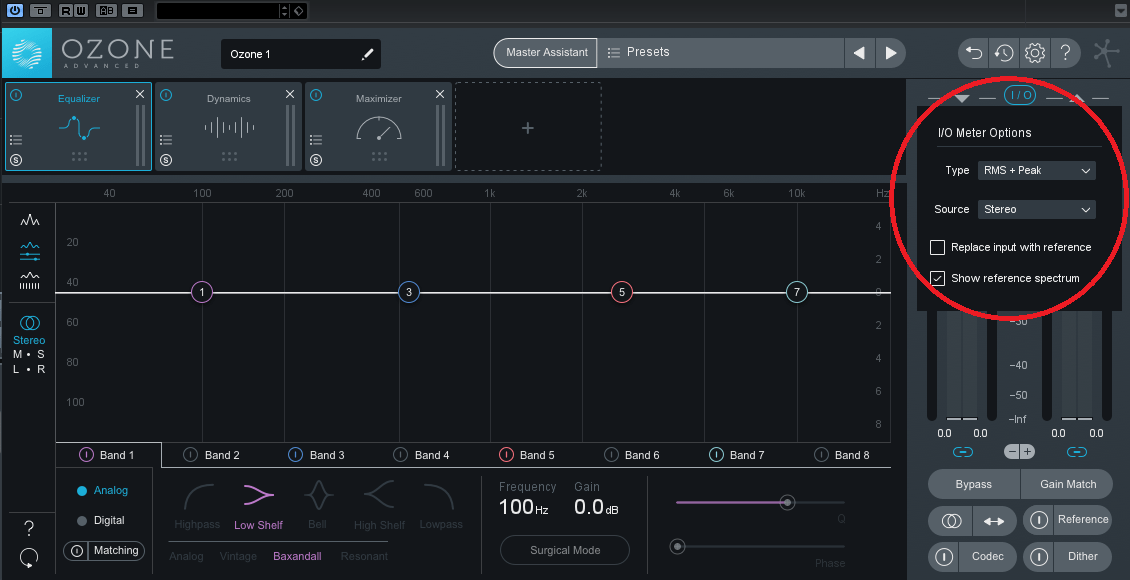
As aforementioned, you can also add a reference to your track to do A/B comparisons. You can import multiple audio files into Ozone 8 to reference against, and they will appear as a tab above the track preview so that you can easily swap between them. This makes working on multiple pieces, or an album, effortless as you can monitor the mixing and mastering of all your songs in one place. You can also turn on the frequency spectrum for your Reference track by hitting the I/O button above your meters and selecting “Show reference spectrum”. This is fantastic for a direct comparison between what you want to achieve and where you’re currently at.
MASTER ASSISTANT
One of Ozone 8’s most fascinating features is the ‘Master Assistant’. The Master Assistant listens to your track and, based on the options you select, applies the settings it believes will achieve the sound you’re going for.
This is not a magic “do my job for me” button, but simply a fantastic way of setting a starting point for your work, and to highlight any problem areas that you may have in your mix that you haven’t yet noticed. It’s ideal especially for those first getting in to mixing and mastering, but is a handy feature for anyone regardless of your level of experience.

You can set a ‘Target’: Streaming, CD, or Reference to get it to listen to a track of your choice. Each of these options will give the Assistant a rough framework of what you want to achieve based on common loudness levels for Streaming/CD or the Reference track you selected. You can also set an ‘Intensity’ of Low, Medium, or High depending on how much you want the Assistant to influence your sound.
The Master Assistant operates in a similar vein to the Track Assistant from Neutron 2 that I will talk about shortly. You can watch the Assistant in action as it goes through a series of steps, such as ‘setting equaliser to adjust spectral balance’, ‘analysing dynamic range’, ‘setting maximizer threshold to hit target loudness’, and more. The end result is truly impressive; always stronger, clearer, and crisper than what you had originally, and excels at providing the necessary punch to hit your loudness target.
NEUTRON 2 ADVANCED
FIRST LOOK
Whilst mixing always comes before mastering, I found myself getting to grips with this bundle quicker by investigating Ozone 8 before Neutron 2. Neutron 2 comes with a slightly more complex loadout, with there sometimes being more steps behind the mixing process. However, it has a near-identical aesthetic to Ozone 8 which is great as your workflow can be interchangeable between the two. iZotope do a fantastic job at making the structure and design of their plugins uniform which makes first time use of any of their products as stress-free as possible.
AUDIO MONITORING
As you can see below (see Fig. 1), Neutron 2 has a very similar monitoring setup to Ozone 8, with your levels visible on the right hand side. There are a few differences, such as the Width fader for widening your stereo field, and your L to R fader which acts as a pan for your output when in stereo. There is also a activate/bypass for a Zero Latency mode, a simplified Limiter and the Neutrino mode. You can use Neutrino to select the kind of track you have Neutron 2 loaded on (e.g. Guitar/Instrument, Vocals/Dialogue, Bass, Clean etc.) and Neutron 2 will apply spectral shaping technology based on the timbre of instrument that it detects. This is great for adding additional separation between instruments and gaining more clarity in your mix.
PRESETS
Like Ozone 8, Neutron 2 also has over 500 presets to choose from. These are divided in to instrument types (Bass, Orchestral, Guitar etc.), subdivided in to ‘Acoustic’ and ‘Electric’, as well as things like ‘Post, Podcast, Broadcast’, ‘Drum Bus’, and ‘Mix Bus’. Some of the presets available include ‘Crisp High End’, ‘Biting Strings’, ‘Forward Dialogue’, ‘Remove Mud’, ‘Epic Action Trailer’, and more, and, like Ozone 8, are strong starting points for your mix.
PLUGINS
In Neutron 2, the 6 available plugins are already loaded for you, although only the EQ and Compressor are active by default. The Gate, second Compressor, Exciter, and Transient Shaper sit beside them. As with Ozone 8, you can easily drag and drop the plugins to order your FX chain how you want it, and bypass, change preset, or adjust your dry/wet balance all within the icons. The 6 plug-in limit can again be restrictive, but Neutron 2 does well to provide everything that you need, and there is always the option use third party plugins of your choice alongside it. The plugins all operate in a similar manner to Ozone 8, but have some minor differences.

COMPRESSOR
Neutron 2’s Compressor operates in a similar fashion to Ozone 8, and includes all of the required features of a standard compressor. However, it also has two different compression styles: Digital and Vintage. The digital style is designed more for precise adjustments of your sound, whereas the vintage sound thrives on providing the warmth and sonic personality of old analog compressors. When in vintage mode, the compressor’s behaviour becomes slightly different to digital, with a quicker attack and slower release that gives a tighter sound. While the digital compressor will give you a tighter control over your value adjustments and is perfect for a more surgical mix approach. There are advantages to both styles of compression depending on what material you are working on.
The compressor’s Side-Chaining ability is also a personal favourite. Once again, a multiband feature is available here so you can isolate the bands that the side-chain focuses on. You can also influence what input the side-chain responds to. By default, it will use its own audio input, but you can select either of the other two bands, so you can have your low frequency elements being triggered by your mid or high frequency elements and vice versa. You can also use audio from another chain or bus in your project.
TRANSIENT SHAPER
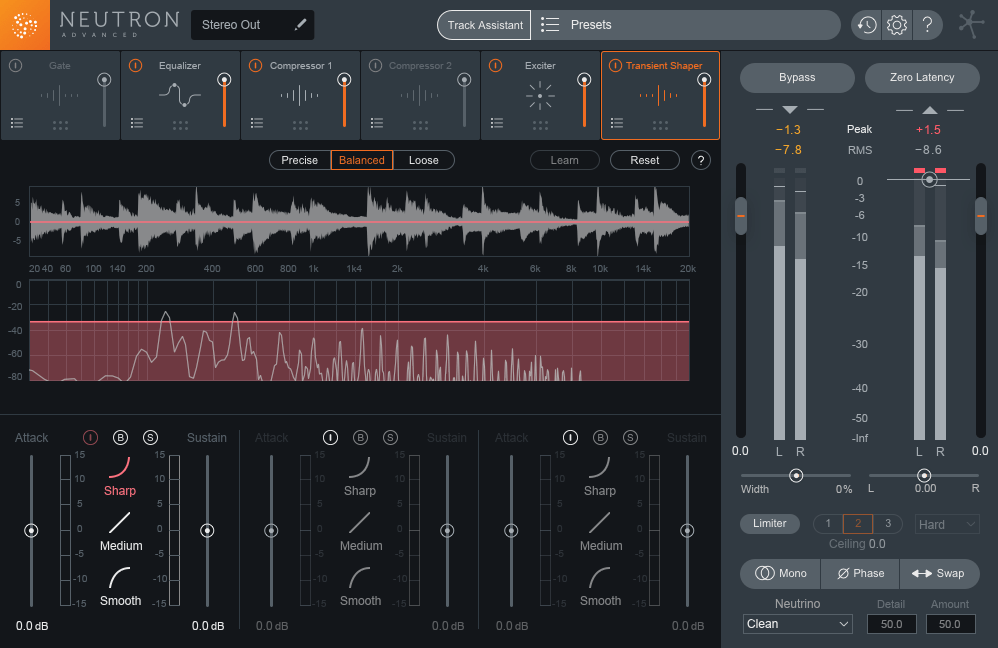
The ‘Transient Shaper’ is a nice component in Neutron 2. You can select ‘Precise’, ‘Balanced’ or ‘Loose’ depending on how impactful you want the Transient Shaper to be on your sound. Its ‘Contour’ options allow you to shape your transients around the frequency spectrum which permits you to specifically target each band, and enable you to give more power to a kick drum without interfering with a piano part, for example. ‘Sharp’ is best for quick hitting or percussive elements, ‘Medium’ is more of an across-the-board contour that will work with most material, and ‘Smooth’ is more appropriate for slower, subtler, or more sustained material and will have a gentler effect. As with any of Ozone’s other multiband tools, you can solo or bypass any band with a simple button click to get a quick grasp on whether your choices are improving your mix.
EXCITER
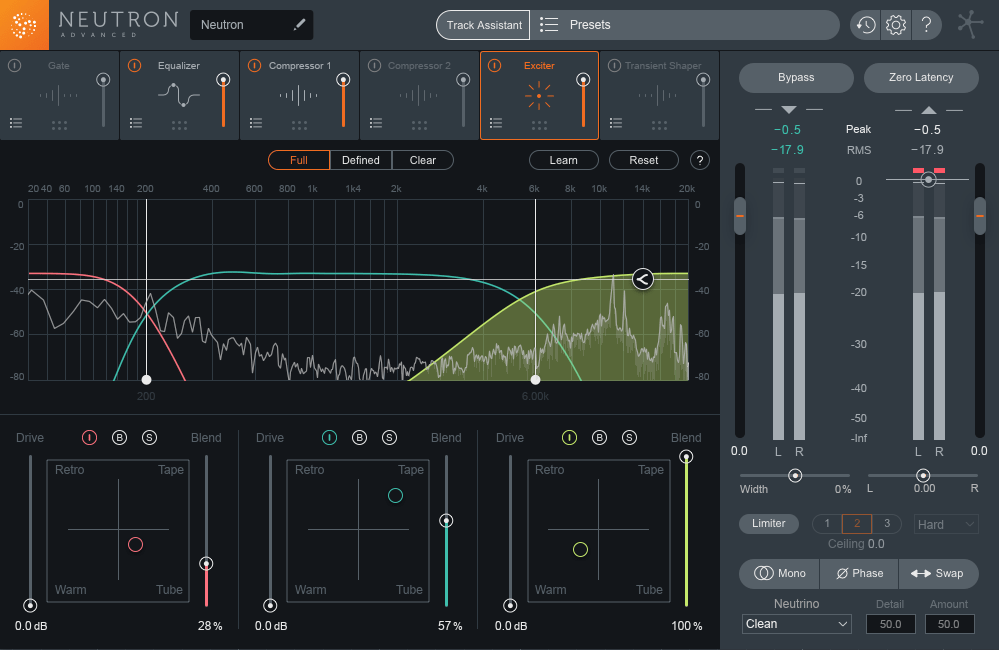
Neutron 2’s Exciter is great fun to play with and will add some carefully curated saturation using tube, tape, and two of iZotope’s unique algorithms. There are three modes to select: ‘Full’, ‘Defined’, or ‘Clear’. These will be your starting point for what approach you want the Exciter to take. Below your spectrum, you will see three graphs with ‘Drive’ and ‘Blend’ faders. The blend system is fantastic, with a wonderful visual control that allows you to get the perfect blend between four kinds of saturation: Retro, Tape, Warm, and Tube. This system is available for each band which gives you the power to shape the saturation exactly how you need it to be. Like everything else, iZotope have made the Exciter as easy as possible to use. You can activate, bypass, and solo each band with a simple click, and the ability to solo them becomes invaluable as it enables you to isolate what the Exciter is contributing to each band of your track. iZotope’s intelligent ‘Learn’ feature is also available with the Exciter, and selecting this will tell Neutron 2 to listen to your track and adjust the settings based on what it thinks is best.
TRACK ASSISTANT
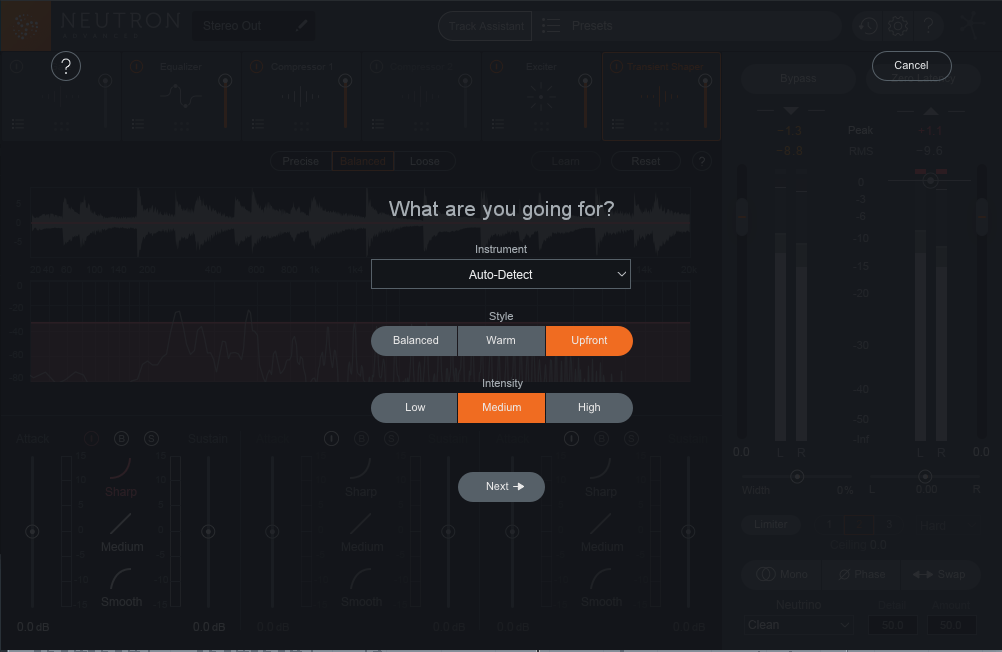
Much like Ozone 8’s ‘Master Assistant, Neutron 2 has the ‘Track Assistant’. They operate in a very similar manner, but instead of choosing your mastering target, you choose your ‘style’ of mix: Balanced, Warm, or Upfront. Once again, the Intensity option is available to choose how in-depth iZotope goes with its recommended choices. Once again, the results were beyond my expectations. It added a width and a clarity to every track or project that I tried it on, and instantly highlighted that samples I was using benefited massively from a bit of clean-up in the low and mid ranges. Once again, whilst it’s not intended to do the job for you, it’s fantastic for securing your track in a strong starting point and placing all of the elements in to the right space. Not only that, but within a matter of moments, you are able to see exactly what the Assistant has changed, make notes of what you feel works or doesn’t work, and further educate yourself about how to achieve the sound you want.
VISUAL MIXER
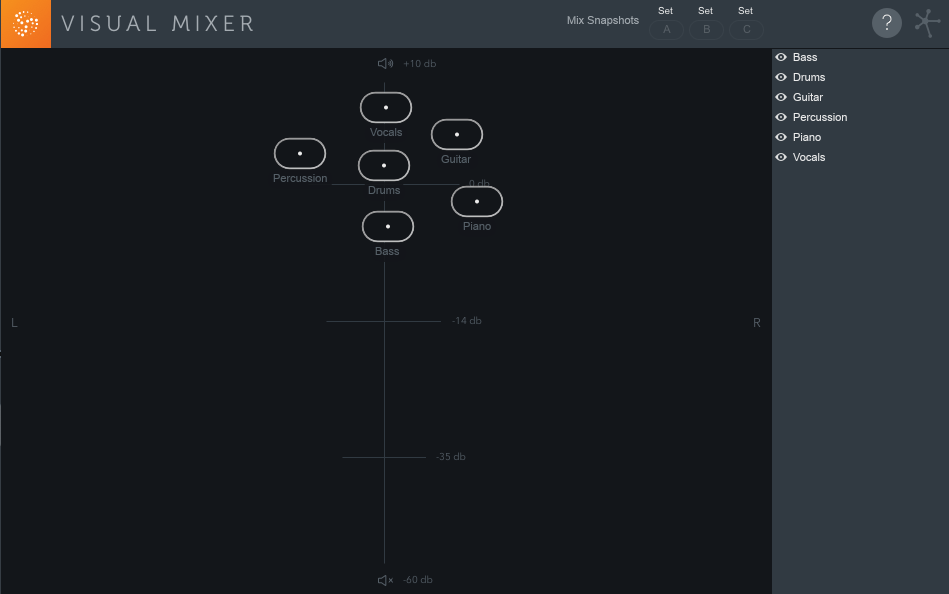
The ‘Visual Mixer’ is one of iZotope’s most fascinating developments. The purpose of the Visual Mixer is to give you a visual representation of the sound stage of your track. Visual mixing is a concept that most of us are aware of, at least subconsciously, but to be able to have it before you in a tool that you can use is something else entirely. To use it, simply load an instance of Neutron 2 or Neutron Mix Tap on your individual tracks or group tracks. Mix Tap is a brilliant additional channel strip that will take all incoming information from Neutron 2, Ozone 8, Visual Mixer, and Tonal Balance Control and present it to you in one master fader. Visual Mixer’s operation is wonderfully simple, you drag instruments higher or lower to adjust their volume and left to right to adjust their place in the stereo field. You can also click on each instrument (or group) and drag either of the markers to expand the stereo width of that instrument/group. In my simplified example below, I loaded Neutron 2 on my group tracks just to cast a simple balance between the main elements of my track, but it is completely within your power to have each of your tracks loaded in the Visual Mixer so you can have total influence over where each instrument sits in the space. The Visual Mixer makes getting into the head space of mixing absolutely seamless and is again another feature ideal for anyone regardless of their prior mixing experience.

TONAL BALANCE CONTROL
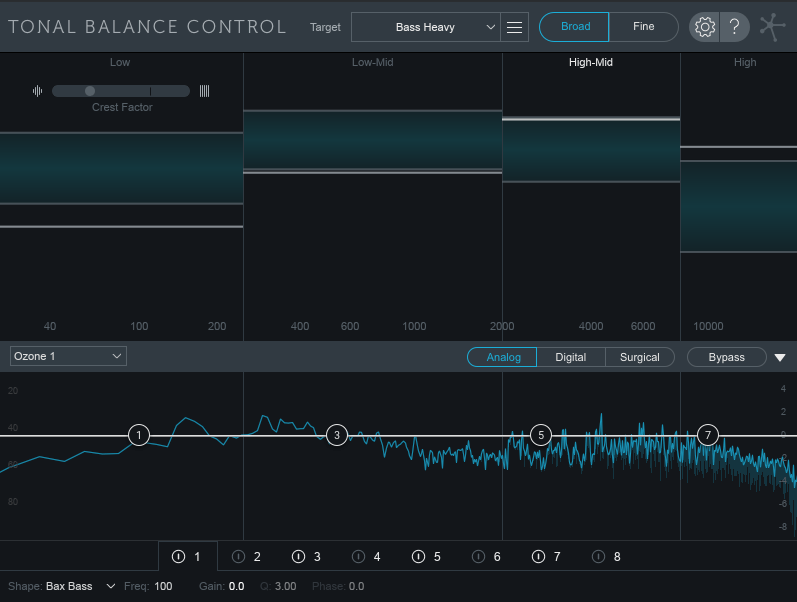
A final phenomenal feature available with the O8N2 Bundle is the ‘Tonal Balance Control’. A pioneering piece of software, it is designed to put on at the last stage of your mix or master to have a broad overview of whether your track has an even balance across the frequency spectrum. You can choose set styles, such as Bass Heavy, Orchestral, Modern etc., and this will show you a recommended balance based on the style you selected. The Tonal Balance will update throughout your track so you can get a feel for the frequency balance across your entire piece. The white lines represent where your track is currently sitting, and the blue areas are the recommended guidelines for where they should be. Once again, iZotope allow you to incorporate your reference track with this and measure your balance based on the guidelines from your reference. The incredible thing about Tonal Balance Control is that you can use it as a combining mechanism between Ozone 8 and Neutron 2. By selecting either Neutron or Ozone as your input signal, you can observe the frequency spectrum that is going through them, make comparisons, and add any additional EQ tweaks where necessary.
CONCLUSION
The intellect and the power behind iZotope’s programs has always astounded me, and Ozone 8 and Neutron 2 have done that more than ever. The wonderful thing about these suites, and the instalments that have come before them, is that they truly help to simplify the mixing and mastering processes as much as possible for the user. Both Ozone 8 and Neutron 2 are ideal pieces of software for anyone on the scale of fresh-faced newcomer to industry veteran.
The greatest benefit for me has been the immediate increase in my workflow speed. With everything being a quick click or drag away and the layout so thought-out and functional, both Ozone 8 and Neutron 2 are a dream to operate. With my post-production skills continually developing, the O8N2 bundle allows me to have a control and a confidence over my work that I have never quite had. Their monitoring features enable me to always see exactly what I’m changing in my tracks and how my choices are adapting the sound. The communication that can buy xanax valium online be had between all of the software this bundle provides is incredible. Rather than trying to carry out individuals stages of your production process and pull it all together at the end, iZotope have crafted their software so you can have everything united every step of the way.
The quality of the plugins are superb and I rarely find myself needing to reach outside of what’s ‘in the box’ with either of these programs when it comes to mixing or mastering my music. They give you everything that you need to craft a professional product, and make that possibility so much more achievable for those with less experience in the field. The more time you spend getting to know them, the further you will be able to develop your ability and the more you will be able to make Ozone 8 and Neutron 2 enhance your work and really make it shine.
Whilst the price tag can be a stretch for those starting out, you cannot put a value on the power this will give you to create professional sounding product, even with a small amount of experience. The features available go far beyond what a review is able to justify, and no matter how much time I spend with these programs, I am continually discovering new to further enable me to cater my sound to exactly how I need it to be.
To learn more about the O8N2 bundle, check out iZotope’s product page here.
LINKS
Official
We hope you enjoyed Katie’s review, check out others in our Reviews section. Don’t forget to sign up to our Monthly Newsletter to make sure you don’t miss out on our reviews and interviews.
We’re also running a Patreon campaign to make sure we can keep bringing you regular, high quality content if you’re feeling generous! Thanks for even sharing!
The Sound Architect


